Total Pageviews

Friday, July 8, 2016

MCP4261 as logarithmic potentiometer

   In previous article, I tested my MCP4261-502E/P dual digital potentiometer, now I show you how can use this dual potentiometer for audio (volume control), for that must change liniar characteristic to logarithmic characteristic (or like this).
   So, I use info from article Controlling Volume - log pots publish on TEXAS INSTRUMENS's site.
   
   For simple sketch and for not use more resource, I use log aproxximation, so I calculate the equations for each straights:
- for first, from 0 to 63%: y = x/5 (I know x=0 -> y=0 & x=50 -> y=10)
- for second, from 63 to 100%: y = 7/3 * x - 400/3 (I know x=70 y=30 & x=100 -> y=100)
  I use same schematic like in previous article:
and I write a sketch for test more cases, this sketch is MCP4261_lin_to_log_1.ino .
  I made 2 movies:

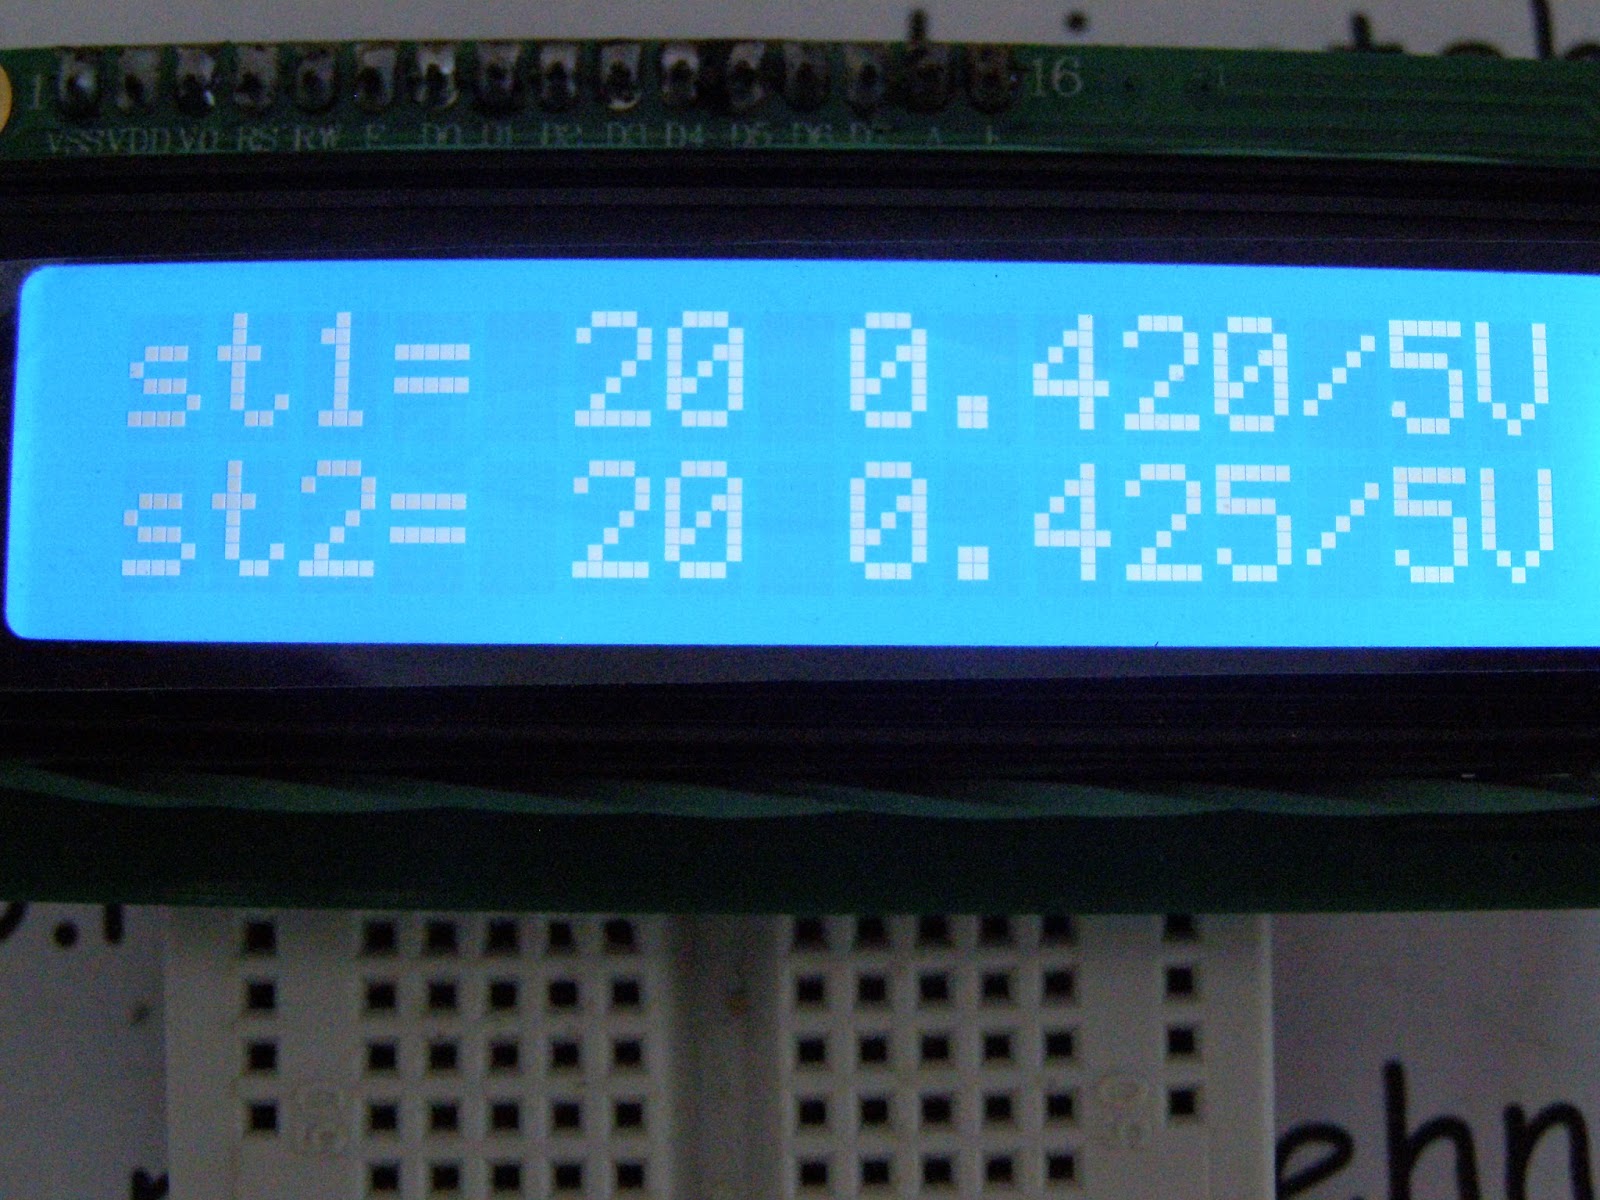
  For digital potentiometer with 16 steps + mute, I have next cases:
   Centralizing, we see some errors but for me there are acceptable:
and I cat continue experiments for implements this digital potentiometer in future audio project..

MCP4261 dual digital potentiometer

   I have an MCP4261-503E/P dual digital potentiometer hwo can control via SPI interface in 256 steps (0 to 255 - 8 bits).
   I use info find in article Arduino - Using digital potentiometers part 2 (MCP4251) from Matthew McMillan's blog.
   My digital potentiometer is in THT/PDIP capsule:
   After info from Mattew's sketch I made my test schematic:
and after made some changes, I upload MCP4261_mega_lcd1602_i2c_test.ino sketch.
   For tests, I have some particular cases:
- both on minimum 
- first potentiomer at minimum and second at maximum:
- first potentimeter at maximum and second at minumum value:
- both at maximum:
and after that I put to change steps from 0 to 255 to see the difference between potentiometers:
   I put on net 2 movies:

FM radio with TEA5767 and Arduino

   A 3 years ago I tested a radio with TEA5767 module controlled by Arduino and use 1602 alphanumerical display (see article named Radio FM cu TEA5767 si... Arduino)
or Nokia 5110 display (see article Radio FM cu TEA5767 si... Arduino (II)
  Now, I use a 1602 alphanumerical display with i2c interface and Arduino Leonardo board:
   Schematic is very simple:
   Using TEA5767_eeprom_i2c_lcd1602_1m1a.ino sketch I can search forward or backward and after I decided what radiostation I listen, frequency value is sotred in internal EEPROM memory of microcontroller from Arduino board.
   In TEA5767 FM radio and Arduino movie you cand see all feature of this radio with Arduino...

MCP41xxx digital potentiometer

   I have one MCP41010 digital potentiometer with 10kohms value in 256 steps (0 to 255 steps = 8 bits) who can controllled by a microcontroler or development board thru SPI conenctor.

   I search info about this digital potentiometer and I noted 2 usefull articles:

   I use Arduino Mega board in this schematic:
am I use MCP41xxx_lcd1602_i2c_test.ino sketch.
   After I read the datasheet I realised this digital potetiometer has a "wiper ressitance". Tipical value for 5V is 52 ohms (maximum 100 ohms).
   In tests, I can see:
- minimum value (step no. 0):
- maximum value (step no. 255):
If I change potentiometer at 3.3V, I can see:
- minimum value (step no. 0):
- maximum value (step no. 255):
   You can see test with MCP41010 digital potentiometer and Arduino Mega (2) movie for understund more clear what i write:


Soil moisture control in 4 zones

   For a real garden you need a suystem for soil moisure control in more zones, so, I made a siystem for 4 zones.
   Schematic is simple:
   I write a sketch for this who can download from my channel Github !
   Eatch soil sensor is powered few seconds when measure humidity after that is powerred off (tens of seconds):
- first sensor powered:
- second sensor is powered:
- third sensor is powered:
- fourth sensor is powered:
   You can see two movies:
soil moisture control in 4 zones using Arduino
soil moisture control in 4 zones using Arduino (2)
30.07.2016
   Because are 2 version of relay module:
- with normal control when if you give 5V at input module relay relay is energized and coil is powered, normal open contact is close 
- with negative control (inversed control) when give 5V at input module realy is cut the power at coil, normal open contact is open ...
  So, I put a jumper for easy use of relay modules, when jumper is open (in air) it use normal control and when jumper is close it use negative control.
  Schematic is simple just add jumper:
and must use sketch named lcd1602_i2c_soilhumidity_ver4.ino !

Monday, July 4, 2016

Soil moisture/humidity control system (part 2)

   In previous article I present you a simple metode for read and control soil humidity (soil moisture) and for protect the probe of soil moisture sensor with intermitent power of sensor (just few seconds when measure process - at 5 second whem pump is on for not flooding and at few minutes wheh humidity is ok).
   Now, I put a inportant indication: time elapsed since the last watering process (maximum 999 hours 59 minutes, using millis() soubrotine, see article from https://www.arduino.cc/en/Reference/Millis).
   For that, I use a sketch like lcd1602_i2c_umditatesol_ver2.ino just change texts in english.
   I use same schematic:
   I made 2 movies: